Categories
AS3 Flash

Hello box2D – part 2

In my previous post I started with a “Hello world” for box2DFlash.
You can find the original here: AS3: Hello Box2D.

When you get it working you will not be satisfied: a black swf, with only a trace in the output panel.

Today I will make the “Hello world” more visible.

Debug_Drawing

This the preferred method of drawing these physics entities for debugging, rather than accessing the data directly. The reason is that much of the necessary data is internal and subject to change.

source: Debug_Drawing

Box2D has a debugDraw class that lets you see what you have built, they call it DebugDraw.
Take the code from yesterday and place this code before Simulating_the_World code.
[as]
var debugDraw:b2DebugDraw = new b2DebugDraw();
debugDraw.m_sprite = new Sprite();

addChild(debugDraw.m_sprite);

debugDraw.m_drawScale = 30;
debugDraw.m_fillAlpha = .25;
debugDraw.m_lineThickness = 1;
debugDraw.m_drawFlags = b2DebugDraw.e_shapeBit | b2DebugDraw.e_jointBit ;
world.SetDebugDraw (debugDraw);
[/as]

Thx Boy Wonder for pointing me to a little mistake in the part of the code: I forgot the last piece of code world.SetDebugDraw (debugDraw);. The class at the bottom of the page was correct!

So all you need to do is CTRL+ENTER.

Nice effect isn’t it? Almost? Well at least you see something although it’s not impressive…
Yeah, it’s isn’t much. Lets see how we can improve this.

Improve Debug_Drawing

The problem is that the debug window is created and executed 60 times, but because it is done in a for loop, you only see the end result (after 60 updates).
To see animation (if you follow the trace you see that something is moving) we need to update (visible) the data in dbgDraw more and we will use the frame rate to update it (yesterday set to 60 frames).
But for that there needs to be changed more than just a couple of lines

First we need to add some variables:
[as]
private var world:b2World;
private var body:b2Body;
[/as]
and change some related code:
[as]
// Construct a world object
// var world:b2World = new b2World(worldAABB, gravity, doSleep); // [mck]: old code
world = new b2World(worldAABB, gravity, doSleep);
[/as]
and
[as]
// var body:b2Body = world.CreateBody(bodyDef); // [mck]: old code
body = world.CreateBody(bodyDef);
[/as]

and remove the code add at Simulating_the_World with
[as]
addEventListener(Event.ENTER_FRAME, onUpdateHandler, false, 0, true);
[/as]

and add
[as]
////////////////////////////////////////////////////////////////////////////////////////////////////
// http://www.box2d.org/wiki/index.php?title=Manual/AS3#Simulating_the_World_.28of_Box2D.29
////////////////////////////////////////////////////////////////////////////////////////////////////
public function onUpdateHandler(e:Event):void{

var timeStep:Number = 1.0 / 60.0;
var iterations:Number = 10;

world.Step(timeStep, iterations);

var position:b2Vec2 = body.GetPosition();
var angle:Number = body.GetAngle();
trace(position.x +’,’+ position.y +’,’+ angle);
}
[/as]

End result

The document class (HelloWorld.as) will look like this:

[as]
package {

import flash.display.*;
import flash.events.*;
// Box2D Classes used in this "Hello world"
import Box2D.Dynamics.*;
import Box2D.Collision.*;
import Box2D.Collision.Shapes.*;
import Box2D.Common.Math.*;

// [SWF(width="640", height="480", backgroundColor="#000000", frameRate="60")]
public class HelloWorld3 extends Sprite {

private var body:b2Body;
private var world:b2World;

// constructor
public function HelloWorld() {
trace( "HelloWorld.HelloWorld" );

////////////////////////////////////////////////////////////////////////////////////////////////////
// http://www.box2d.org/wiki/index.php?title=Manual/AS3#Creating_a_World
////////////////////////////////////////////////////////////////////////////////////////////////////
// Create world AABB
var worldAABB:b2AABB = new b2AABB();
worldAABB.lowerBound.Set(-100.0, -100.0);
worldAABB.upperBound.Set(100.0, 100.0);

// Define the gravity vector
var gravity:b2Vec2 = new b2Vec2 (0.0, -10.0);

// Allow bodies to sleep
var doSleep:Boolean = true;

// Construct a world object
// var world:b2World = new b2World(worldAABB, gravity, doSleep); // [mck]: old code
world = new b2World(worldAABB, gravity, doSleep);

////////////////////////////////////////////////////////////////////////////////////////////////////
// http://www.box2d.org/wiki/index.php?title=Manual/AS3#Creating_a_Ground_Box
////////////////////////////////////////////////////////////////////////////////////////////////////
var groundBodyDef:b2BodyDef = new b2BodyDef();
groundBodyDef.position.Set(0.0, -10.0);

var groundBody:b2Body = world.CreateBody(groundBodyDef);

var groundShapeDef:b2PolygonDef = new b2PolygonDef();
groundShapeDef.SetAsBox(50.0, 10.0);

groundBody.CreateShape(groundShapeDef);

////////////////////////////////////////////////////////////////////////////////////////////////////
// http://www.box2d.org/wiki/index.php?title=Manual/AS3#Creating_a_Dynamic_Body
////////////////////////////////////////////////////////////////////////////////////////////////////
var bodyDef:b2BodyDef = new b2BodyDef();
bodyDef.position.Set(0.0, 4.0);
// var body:b2Body = world.CreateBody(bodyDef); // [mck]: old code
body = world.CreateBody(bodyDef);

var shapeDef:b2PolygonDef = new b2PolygonDef();
shapeDef.SetAsBox(1.0, 1.0);
shapeDef.density = 1.0;
shapeDef.friction = 0.3;
body.CreateShape(shapeDef);
body.SetMassFromShapes();

////////////////////////////////////////////////////////////////////////////////////////////////////
// http://www.box2d.org/wiki/index.php?title=Manual/AS3#Debug_Drawing
////////////////////////////////////////////////////////////////////////////////////////////////////
var debugDraw:b2DebugDraw = new b2DebugDraw();
debugDraw.m_sprite = new Sprite();

addChild(debugDraw.m_sprite);

debugDraw.m_drawScale = 30;
debugDraw.m_fillAlpha = .25;
debugDraw.m_lineThickness = 1;
debugDraw.m_drawFlags = b2DebugDraw.e_shapeBit | b2DebugDraw.e_jointBit ;
world.SetDebugDraw (debugDraw);

//
addEventListener(Event.ENTER_FRAME, onUpdateHandler, false, 0, true);
}

////////////////////////////////////////////////////////////////////////////////////////////////////
// http://www.box2d.org/wiki/index.php?title=Manual/AS3#Simulating_the_World_.28of_Box2D.29
////////////////////////////////////////////////////////////////////////////////////////////////////
public function onUpdateHandler(e:Event):void{

var timeStep:Number = 1.0 / 60.0;
var iterations:Number = 10;

world.Step(timeStep, iterations);

var position:b2Vec2 = body.GetPosition();
var angle:Number = body.GetAngle();
trace(position.x +’,’+ position.y +’,’+ angle);
}

} // end class

} // end package
[/as]

So all you need to do is CTRL+ENTER.

Now we see something moving, and we have an endless stream of trace data.

It’s better, but there is more room for improvement…
tomorrow more.
Categories
AS3 Flash

Hello box2D – part 1

In programming the Hello world is probably the first you will ever make in a new language.
In the box2D wiki you can find a “Hello world” in box2DFlash style: AS3: Hello Box2D.

Easy as it should be … or is it?
This is not the “Hello world” I expected, so I’ll post one that helps you more on your way.

As irongleet mentions in the comments, this is not really a tutorial. There is already a tutorial on the page I mention above AS3: Hello Box2D. It’s not a bad tutorial, but you need to have some knowledge of AS3 to follow it and I personally don’t like the end result. So this is the first part of a series which will help you make more out of the previously mentioned tutorial. But I’m not going to copy past the tutorial written somewhere else and present it here. That’s why you should read the links to the source for more information. And the next Hello box2d – part 2 will have some more input from me.

Hello_Box2D

source: Hello_Box2D

Lets start with a Flash document width 640px, height 480px, backgroundColor=”#000000″ and a framerate 60.
And add a document class: HelloWorld.
Save this .fla (for example HelloWorldBox2d.fla).

Now get your favorite code-editor (I suggest FlashDevelop) and create that document class, name it HelloWorld.as:
[as]
package {

import flash.display.Sprite;
import flash.events.Event;
// Classes used in this example
import Box2D.Dynamics.*;
import Box2D.Collision.*;
import Box2D.Collision.Shapes.*;
import Box2D.Common.Math.*;

public class HelloWorld extends Sprite{

// constructor
public function HelloWorld() {
trace( “HelloWorld.HelloWorld” );
}

} // end class

} // end package
[/as]
and save it next to the HelloWorldBox2d.fla.

You can see that I already add the import needed for Box2D.

The last thing you need to do is download the box2D classes: http://sourceforge.net/projects/box2dflash
Extract the zip file and copy the folder box2d next to the HelloWorldBox2d.fla and the HelloWorld.as

And now you are set…

Creating_a_World

Every Box2D program begins with the creation of a world object. This is the physics hub that manages memory, objects, and simulation.

source: Creating_a_World

The next piece of code can be placed in the constructor (public function HelloWorld() )
[as]
// Creat world AABB
var worldAABB:b2AABB = new b2AABB();
worldAABB.lowerBound.Set(-100.0, -100.0);
worldAABB.upperBound.Set(100.0, 100.0);

// Define the gravity vector
var gravity:b2Vec2 = new b2Vec2 (0.0, -10.0);

// Allow bodies to sleep
var doSleep:Boolean = true;

// Construct a world object
var world:b2World = new b2World(worldAABB, gravity, doSleep);
[/as]

Creating_a_Ground_Box

source: Creating_a_Ground_Box

[as]
var groundBodyDef:b2BodyDef = new b2BodyDef();
groundBodyDef.position.Set(0.0, -10.0);

var groundBody:b2Body = world.CreateBody(groundBodyDef);

var groundShapeDef:b2PolygonDef = new b2PolygonDef();
groundShapeDef.SetAsBox(50.0, 10.0);

groundBody.CreateShape(groundShapeDef);
[/as]

Creating_a_Dynamic_Body

We can use the same technique to create a dynamic body. The main difference, besides dimensions, is that we must establish the dynamic body’s mass properties.

source: Creating_a_Dynamic_Body

[as]
var bodyDef:b2BodyDef = new b2BodyDef();
bodyDef.position.Set(0.0, 4.0);
var body:b2Body = world.CreateBody(bodyDef);

var shapeDef:b2PolygonDef = new b2PolygonDef();
shapeDef.SetAsBox(1.0, 1.0);
shapeDef.density = 1.0;
shapeDef.friction = 0.3;
body.CreateShape(shapeDef);
body.SetMassFromShapes();
[/as]

Simulating_the_World

So we have initialized the ground box and a dynamic box. Now we are ready to set Newton loose to do his thing. We just have a couple more issues to consider.

source: Simulating_the_World
[as]
var timeStep:Number = 1.0 / 60.0;
var iterations:Number = 10;

for (var i:Number = 0; i < 60; ++i) { world.Step(timeStep, iterations); var position:b2Vec2 = body.GetPosition(); var angle:Number = body.GetAngle(); trace(position.x +','+ position.y +','+ angle); } [/as]

End result

The document class (HelloWorld.as) will look like this:

I didn’t wrote the code for this tutorial, so this is collection of code copy/paste from the original AS3: Hello Box2D tutorial. But I did, as many probably did, the original tutorial and I was a little disappointed at the end result… so my addition to the original tutorial can be read in the next part of this series (Hello box2d – part 2)

[as]
package {

import flash.display.Sprite;
// Box2D Classes used in this “Hello world”
import Box2D.Dynamics.*;
import Box2D.Collision.*;
import Box2D.Collision.Shapes.*;
import Box2D.Common.Math.*;

public class HelloWorld2 extends Sprite {

// constructor
public function HelloWorld() {
trace( “HelloWorld.HelloWorld” );

////////////////////////////////////////////////////////////////////////////////////////////////////
// http://www.box2d.org/wiki/index.php?title=Manual/AS3#Creating_a_World
////////////////////////////////////////////////////////////////////////////////////////////////////
// Create world AABB
var worldAABB:b2AABB = new b2AABB();
worldAABB.lowerBound.Set(-100.0, -100.0);
worldAABB.upperBound.Set(100.0, 100.0);

// Define the gravity vector
var gravity:b2Vec2 = new b2Vec2 (0.0, -10.0);

// Allow bodies to sleep
var doSleep:Boolean = true;

// Construct a world object
var world:b2World = new b2World(worldAABB, gravity, doSleep);

////////////////////////////////////////////////////////////////////////////////////////////////////
// http://www.box2d.org/wiki/index.php?title=Manual/AS3#Creating_a_Ground_Box
////////////////////////////////////////////////////////////////////////////////////////////////////
var groundBodyDef:b2BodyDef = new b2BodyDef();
groundBodyDef.position.Set(0.0, -10.0);

var groundBody:b2Body = world.CreateBody(groundBodyDef);

var groundShapeDef:b2PolygonDef = new b2PolygonDef();
groundShapeDef.SetAsBox(50.0, 10.0);

groundBody.CreateShape(groundShapeDef);

////////////////////////////////////////////////////////////////////////////////////////////////////
// http://www.box2d.org/wiki/index.php?title=Manual/AS3#Creating_a_Dynamic_Body
////////////////////////////////////////////////////////////////////////////////////////////////////
var bodyDef:b2BodyDef = new b2BodyDef();
bodyDef.position.Set(0.0, 4.0);
var body:b2Body = world.CreateBody(bodyDef);

var shapeDef:b2PolygonDef = new b2PolygonDef();
shapeDef.SetAsBox(1.0, 1.0);
shapeDef.density = 1.0;
shapeDef.friction = 0.3;
body.CreateShape(shapeDef);
body.SetMassFromShapes();

////////////////////////////////////////////////////////////////////////////////////////////////////
// http://www.box2d.org/wiki/index.php?title=Manual/AS3#Simulating_the_World_.28of_Box2D.29
////////////////////////////////////////////////////////////////////////////////////////////////////
var timeStep:Number = 1.0 / 60.0;
var iterations:Number = 10;

for (var i:Number = 0; i < 60; ++i) { world.Step(timeStep, iterations); var position:b2Vec2 = body.GetPosition(); var angle:Number = body.GetAngle(); trace(position.x +','+ position.y +','+ angle); } } } // end class } // end package [/as] So all you need to do is CTRL+ENTER. Nice effect isn't it? No? Only some numbers in the output panel? Yeah I know that was not very useful... So next post will be a better/improved version of the Hello world box2D style >> read Hello box2d – part 2

Categories
AS3 Flash

Box2DFlashAS3 Refactored

If you are a Flex/Flash developer (and not familiar with another programming language), you will agree that the syntax for Box2DFlash is not following the AS3 coding conventions and seems funny.

Not that I’m so good at it (seem to have a lot of problem shaking the suffix “_mc”) but other people have the same problem: read this, this and this.

And one of them refactored the code, and not just someone: it done by John Lindquist (box2D user-name is pv3d).
John is one of the “Committer team” (?) of papervision3D and writes tutorials for papervision3D on pv3d.org.

You can find the code at http://code.google.com/p/box2dflash/ and John started working on tutorials (http://box2dflash.org/) but stopped after completing one… 🙁

[swf]http://box2dflash.org/sites/default/files/flash/RefactoredBox2dSpeedTest.swf, 520, 390[/swf]

I’ve took a quick look in the examples made by John, and I must confess that it seems more familiar/easier.
Conventions are you friend…

But what to do? Use the box2D port to AS3 from C++ or use the refactored one.
I’m using the original Box2DFlash AS3 2.0.1, not only for this reason (shaktool is one of two programmers responsible for the C++ to AS3 conversion and maintenance) but a lot of tutorials are based upon the original.

But I can’t wait for Box2DFlash AS3 2.0.2 and see what skatehead, shaktool and borisTheBrave have decided (I’m secretly cheering for John’s version!)

Categories
AS3 Flash

Box2DFlashAS3 documentation

In a previous post I started my journey into Flash physics by using Box2D.
And I “complained” about the documentation.

So I decided to create one for the boys & girls at the box2d Flash AS3 forum using ASDoc…..

Someone beat me to the punch: BorisTheBrave created a script to convert the current comment into ASDoc style comments and the result is posted here:
The unofficial Box2DFlashAS3 Documentation.

BorisTheBrave has made an update to the documentation: read more about that. I have really no idea what he did, I downloaded the files, but just over write existing files… why?
Anyway the Box2dAS3 documentation looks very nice, and that is the most important stuff he did!!
Categories
AS3 Flash

AS3 Flash Physics Engine Box2D

I was looking for a physics engine for Flash so I started looking for one… there are a lot of engines…
I won’t mention them all, there are enough people who did that already (here, here, here and here)

If the list is that big, how to choose?
Well I also want to use it with papervision3d so I googled on that and if someone checked out a couple of engines (this guy checked out 3).
And in one of my rss feeds there is a guy who builds games, and now it writing tutorials for box2d 😉

So I decided on box2d.

Box2D is an open source physics engine written primarily for games. As the name suggests, Box2D is a purely 2D engine. However, Box2D has grown beyond it’s humble box simulating roots, and can now handle convex polygons and other shapes coming soon.

Box2D is written in C++, but there is a port to as3: AS3 Flash Physics Engine Box2DFlashAS3 2.0.1.

[swf]http://box2dflash.sourceforge.net/PhysTest201.swf, 520, 292[/swf]

Box2DFlashAS3 is an open source port of Erin Catto‘s powerful c++ physics library Box2D.

There is not a lot of information about Box2DFlashAS3 and tutorials are even harder to find.
So here some useful links:

Emanuele Feronato (an Italian PROgrammer) has written an extremely useful tutorial: box2d tutorial for the absolute beginners/. This one is a very good starting point!

I will write about the problems that I encounter with Box2D, I hope that will help you in your quest to understand box3DFlash.


Because I’m quite lazy, I didn’t mention all the as3 physics engines but you can: just make a comment about any engine and perhaps why you are working with that engine…

Categories
AS3 AS3 migration Flash

From AS2 to AS3 – Where did it go – attachSound

Where did attachSound go in AS3?

It’s almost the same as attachMovie (I already covered attachMovie: read attachMovie post)

I was never very good in sound, and I didn’t use it a lot in my applications/animations. That changed with my new job. But for the people that remember attachSound in AS2, this is how its done in AS3…

This post is only handy when you link sound from the library, both AS2 and AS3. Dynamically loaded sound (MP3) is another story.

What has the ActionScript 2.0 Migration to say about this subject:

ActionScript 2.0  ActionScript 3.0  Comments
attachSound() Method Removed Create an instance of a Sound subclass that is associated with sound data; for example, by using new Sound() instead.

And I say again: Removed… wtf? 😉

In AS2 it will work like this:

Categories
AS3 AS3 migration Flash

From AS2 to AS3 – Where did it go – swapDepths

Where did swapDepths () go in AS3?

This is what the ActionScript 2.0 Migration has to say about this:

ActionScript 2.0  ActionScript 3.0  Comments
swapDepths() Method Removed In ActionScript 3.0, you can achieve similar functionality by using the methods of the DisplayObjectContainer class, such as the addChildAt(), setChildIndex(), swapChildren(), and swapChildrenAt() methods.

Removed… bummer, so with what do I replace it with…

In AS2 you can use swapDepths() in two ways:

  • A Number that specifies the depth level where the movie clip is to be placed.
  • An instance name that specifies the movie clip instance whose depth is swapped with the movie clip for which the method is being applied. Both movie clips must have the same parent movie clip.

In the examples there are two movieClips: ‘circle_mc‘ and ‘square_mc‘. Movieclip square_mc is under circle_mc (z-index is lower then circle_mc). And the task is to get square_mc above circle_mc.

AS 2

There are a couple of ways to do that in ActionScript 2:

Example #1
Swap the depth of two movieclips which each other (square_mc will be placed on the depth of circle_mc, and the other way around)
this.square_mc.swapDepths(this.circle_mc);

Example #2
I consider this a hack, but one that works
this.square_mc.swapDepths(1000000);

Example #3
When you want to change the depth of something, this is usually to place it on top:
this.square_mc.swapDepths(this.getNextHighestDepth());

AS 3

Lets try this in ActionScript 3:

Example #1
this.swapChildren(square_mc, circle_mc);
Visit livedocs at the Adobe site for more information and example code
[as]
var square = this.getChildByName (‘square_mc’);
var circle = this.getChildByName (‘circle_mc’);

trace(this.getChildAt(0).name); // square_mc
trace(this.getChildAt(1).name); // circle_mc

this.swapChildren(square as DisplayObject, circle as DisplayObject);

trace(this.getChildAt(0).name); // circle_mc
trace(this.getChildAt(1).name); // square_mc
[/as]

Example #2
not possible anymore… if you want a detailed explanation visit dreaming in Flash blog, and read more about swapDepths() in AS3 (it’s explained with a image)

Example #3
To place a movieclip on the highest depth in actionscript2, we will use MovieClip.getNextHighestDepth,
but in AS3 that function is removed 🙁

In AS3 you need to use numChildren:
this.setChildIndex ( square_mc , this.numChildren - 1 );
Visit livedocs at the Adobe site for more information and example code

I realize that this is not a complete explanation… but I hope this is a starting point to find old function that you used in AS2

Categories
AS3 Custmm Grumm Extending Flash Grumm Urban papercraft

Custmm Grumm – AI 2 Array

Another experiment towards Custmm Grumm. This time my task was to export/import an Illustrator file to Flash…

Yeah, yeah; I know: you say “import to stage” … correct! 😉
But what I need is the shape converted to code (coordinates in the x-direction and y-direction)..
Ha, you stopped grinning!

Well the first part is correct.
You need to import the file to the stage and give every imported shape it’s own layer.
This is something that you don’t want to do by hand (I didn’t want to 😉 ), so I wrote a jsfl that fixes that for you (read my post about it here: object-to-layer-jsfl)

After that you need to extract the values (x and y-positions form the corners of the shapes) of the files. Some thing, you don’t want that to do by hand: I have written a jsfl who does that. (read more about that here: shape-2-array-jsfl )

If you use these two scripts, you get: all imported shapes in different layers, and you can extract all values.
Example of the array:
[as]
var shapeArrayz:Array = new Array ();
shapeArrayz[0] = [[20.05,169.5,0] , [62.425,169.5,1] , [104.8,169.5,2] , [104.8,169.5,0] , [104.8,211.85,1] , [104.8,254.2,2] , [104.8,254.2,0] , [62.425,254.2,1] , [20.05,254.2,2] , [20.05,254.2,0] , [20.05,211.85,1] , [20.05,169.5,2]];
// etc…
[/as]
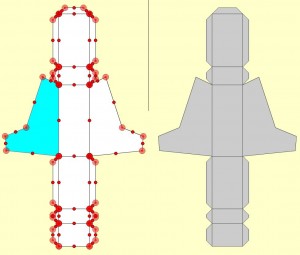
This array off point can be used to generate the shape you just “traced”.

Generated shapes from an Array

This script (below) is used to generate the points (every line has 3 points, the beginning, the end and one inbetween), and the generated shape on the right side (no points, only the shape):
[as]
var shapeArray:Array = [];

// visualize the points
function createPoints2 (_pointArray:Array) {
shapeArray = [];
var point:MovieClipInLibraryWithLinkageName;
for (var i=0; i<_pointArray.length; i++) {
point = new MovieClipInLibraryWithLinkageName();
point.x = _pointArray[i][0];
point.y = _pointArray[i][1];
var switchExpression:uint = _pointArray[i][2];
switch (switchExpression) {
case 0 :
//trace (0);
point.alpha = .5;
shapeArray.push ([_pointArray[i][0],_pointArray[i][1]]);
break;
case 1 :
//trace (1);
point.scaleX = point.scaleY = .5;
break;
case 2 :
//trace (2);
point.alpha = .5;
point.scaleX = point.scaleY = .3;
break;
default :
trace ("Not 0, 1, or 2");
}
addChild (point);
}

}

// draw the new extracted image
function drawArray (_arr:Array) {
// trace ("drawArray ");
var _shape:Shape = new Shape();
_shape.graphics.lineStyle (1, 0x333333, 1);
_shape.graphics.beginFill (0xcccccc);
_shape.graphics.moveTo (_arr[0][0], _arr[0][1]); // starting point
for (var i=1; i<=_arr.length; i+=3) {
_shape.graphics.curveTo (_arr[i][0], _arr[i][1] , _arr[i+1][0], _arr[i+1][1]);
// _shape.graphics.lineTo (_arr[i+1][0], _arr[i+1][1]);
}
_shape.graphics.endFill ();
this.drawContainer_mc.addChild (_shape);
}

// jumpstart everything
function init (){
for (var j=0; j<shapeArrayz.length; j++) {
// trace(shapeArrayz[j])
createPoints2 (shapeArrayz[j]);
drawArray (shapeArrayz[j]);
}
}
init ();

[/as]

Update #1: I previously used point_mc in the code. That was a movieClip in the library with a linkage name. I changed it in the code, I hope that helps.

Eventually I will use the points, and generated shapes to modify the shape (move a point, create a new shape) and/or to add points.

Categories
AS3 Extending Flash Flash

Shape 2 Array jsfl

For a project of mine: Custmm Grumm I needed to change a shape into an array, you could say that I needed to change a Illustrator/vector file into code.

As far as I know there is no other method then the one I created here with jsfl.

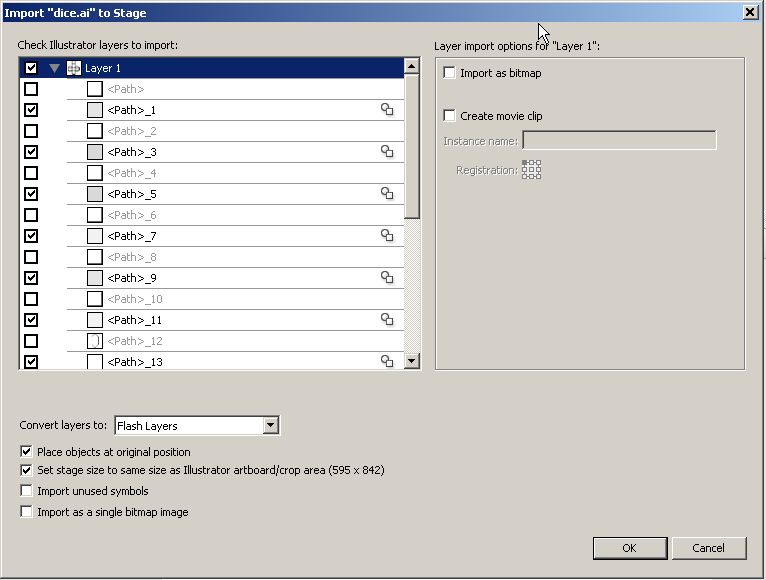
To make this happen I imported the .AI file (Illustrator) to the stage.
Flash import screen

This JSFL files has some restrictions, you can read it in the comments:

this script only works under certain conditions:
– everything that is selected must be shapes, if not, this doesn’t work (select all and ctrl+b (break))
– every shape has to be in a different layer, otherwise the script see it as one shape

The result of this jsfl is not always what you expect…
sometimes geometric shapes like squares/rectangles/triangles are all f#$%ed-up (it looks like curves are made to opposite corners)
I have no solution for that in this jsfl (in the code), it seems that Flash ‘reads’ the shape wrong (or in the wrong order)…
But you could try:

  • I used the straighten tool which worked in one case, but not in the other
  • rotated a square 90 degrees
  • both solutions

I’m not making an install file, so if you want to try this script you need to copy it in the correct directory (I’m sorry for the OsX users: I have no idea, but if you do, place a comment)
Windows (on my computer): C:\Documents and Settings\[here you name]\Local Settings\Application Data\Adobe\Flash CS3\en\Configuration\Commands

here is the JSFL (if you need to give it a name; I have a suggestion: “[mck] shape2array 2.jsfl”)

/**
*
* this script only works under certain conditions:
*		- everything that is selected must be shapes, if not, this doesn't work (select all and ctrl+b (break))
* 		- every shape has to be in a different layer, otherwise the script see it as one shape 
*
* The result of this jsfl is not always what you expect...
* 		sometimes geometric shapes like squares/rectangles/triangles are all f#$%ed-up (it looks like curves are made to opposite corners)
* 		I have no solution for that in this jsfl (in the code), it seems that Flash 'reads' the shape wrong (or in the wrong order)... 
*		But you could try: 	- I used the straighten tool which worked in one case, but not in the other 
*						- rotated a square 90 degrees 
*						- both solutions 
*
*
* 
* based upon 		http://ericlin2.tripod.com/bugwire/bugwiret.html
* and			http://livedocs.adobe.com/flash/9.0/main/wwhelp/wwhimpl/common/html/wwhelp.htm?context=LiveDocs_Parts&file=00003869.html
*
* <pre>
*  ____                   _      ____
* |  __| _ __ ___    ___ | | __ |__  |
* | |   | '_ ` _ \  / __|| |/ /    | |
* | |   | | | | | || (__ |   <     | |
* | |__ |_| |_| |_| \___||_|\_\  __| |
* |____|                        |____|
*
* </pre>
*
*
* @author			Matthijs C. Kamstra [mck]
* @version		1.1
* @since			10:00 5-5-2008
*
* Changelog:
* 		v1.1 [2008-05-09] - test movie after use of this jsfl
* 		v1.0 [2008-05-05] - Initial release
*
*
*/
var currentVersion = '1.1';

fl.trace ('[mck] shape2Array :: version ' + currentVersion);

// with a shape selected
var ptArray = [];
var doneEdge = [];
var exportString = 'var shapeArrayz:Array = new Array ();\n';
var selectionNumber = 0;

// fl.trace("// start ---------------------------");
function isDrawn(id) {
	for (var k = 0; k<doneEdge.length; k++) {
		if (doneEdge[k] == id) {
			return true;
		}
	}
	return false;
}


sel = fl.getDocumentDOM().selection;
for (var n = 0; n < sel.length; n++) {

	exportString += 'shapeArrayz['+n+'] = [';
	selectionNumber = sel.length;
	
	var elt = sel[n];
	if (elt.elementType != 'shape') {
		continue;
	}
	elt.beginEdit();
	for (i=0; i<elt.contours.length; i++) {
		var cont = elt.contours[i];
		var he = cont.getHalfEdge();
		var startId = he.id;
		var id = 0;
		while (id != startId) {
			var ed = he.getEdge();
			if (!isDrawn(ed.id)) {
				doneEdge.push(ed.id);
				for (var j = 0; j<3; j++) {
					var pt = ed.getControl(j);
					ptArray.push(pt.x, pt.y , j);
					exportString += '[' + pt.x + ',' + pt.y + ',' + j + '] , ';
				}
			}
			he = he.getNext();
			id = he.id;
		}
	}
	elt.endEdit();
	exportString += '];\n';
}
// fl.trace(ptArray);
// fl.trace("// end ---------------------------");


// I'm a lazy bastard, so paste the code in the as layer
// create or place code in 'as' layer
var tl = fl.getDocumentDOM().getTimeline();
if (tl.findLayerIndex("as") == undefined){
	tl.addNewLayer('as', 'normal' , true); 
} else {
	tl.currentLayer = tl.findLayerIndex("as")[0];
}
tl.layers[tl.currentLayer].frames[0].actionScript = exportString.split('] , ];').join(']];') + "\n";

// The following example tests the movie for the current document:
fl.getDocumentDOM().testMovie(); // if you don't want to export to swf after the jsfl is ready, comment this line


// end jsfl

It will create a layer named ‘as’ where the array will be placed that will look something like this:

var shapeArrayz:Array = new Array ();
shapeArrayz[0] = [[20.05,169.5,0] , [62.425,169.5,1] , [104.8,169.5,2] , [104.8,169.5,0] , [104.8,211.85,1] , [104.8,254.2,2] , [104.8,254.2,0] , [62.425,254.2,1] , [20.05,254.2,2] , [20.05,254.2,0] , [20.05,211.85,1] , [20.05,169.5,2]];
shapeArrayz[1] = [[189.55,0,0] , [189.55,42.35,1] , [189.55,84.7,2] , [189.55,84.7,0] , [147.175,84.7,1] , [104.8,84.7,2] , [104.8,84.7,0] , [104.8,42.35,1] , [104.8,0,2] , [104.8,0,0] , [147.175,0,1] , [189.55,0,2]];
shapeArrayz[2] = [[189.55,169.45,0] , [231.9,169.45,1] , [274.25,169.45,2] , [274.25,169.45,0] , [274.25,211.8,1] , [274.25,254.15,2] , [274.25,254.15,0] , [231.9,254.15,1] , [189.55,254.15,2] , [189.55,254.15,0] , [189.55,211.8,1] , [189.55,169.45,2]];
shapeArrayz[3] = [[189.55,84.7,0] , [189.55,127.075,1] , [189.55,169.45,2] , [189.55,169.45,0] , [147.175,169.45,1] , [104.8,169.45,2] , [104.8,169.45,0] , [104.8,127.075,1] , [104.8,84.7,2] , [104.8,84.7,0] , [147.175,84.7,1] , [189.55,84.7,2]];
shapeArrayz[4] = [[104.8,169.45,0] , [147.175,169.45,1] , [189.55,169.45,2] , [189.55,169.45,0] , [189.55,211.8,1] , [189.55,254.15,2] , [189.55,254.15,0] , [147.175,254.15,1] , [104.8,254.15,2] , [104.8,254.15,0] , [104.8,211.8,1] , [104.8,169.45,2]];
shapeArrayz[5] = [[104.8,338.95,0] , [104.8,296.55,1] , [104.8,254.15,2] , [104.8,254.15,0] , [147.175,254.15,1] , [189.55,254.15,2] , [189.55,254.15,0] , [189.55,296.55,1] , [189.55,338.95,2] , [189.55,338.95,0] , [147.175,338.95,1] , [104.8,338.95,2]];
shapeArrayz[6] = [[274.25,169.5,0] , [284.275,179.5,1] , [294.3,189.5,2] , [294.3,189.5,0] , [294.3,211.9,1] , [294.3,234.3,2] , [294.3,234.3,0] , [294.275,234.3,1] , [294.25,234.3,2] , [294.25,234.3,0] , [284.325,244.25,1] , [274.4,254.2,2] , [274.4,254.2,0] , [274.325,254.2,1] , [274.25,254.2,2] , [274.25,254.2,0] , [274.25,211.85,1] , [274.25,169.5,2]];
shapeArrayz[7] = [[0.1,189.45,0] , [10.1,179.45,1] , [20.1,169.45,2] , [20.15,254.2,0] , [20.125,211.825,1] , [20.1,169.45,2] , [20.15,254.2,0] , [20.1,254.2,1] , [20.05,254.2,2] , [20.05,254.2,0] , [10.025,244.2,1] , [0,234.2,2] , [0,234.2,0] , [0.05,211.825,1] , [0.1,189.45,2]];
shapeArrayz[8] = [[124.85,359,0] , [114.825,349,1] , [104.8,339,2] , [189.55,338.85,0] , [147.175,338.925,1] , [104.8,339,2] , [189.55,338.85,0] , [189.55,338.925,1] , [189.55,339,2] , [189.55,339,0] , [179.6,349.05,1] , [169.65,359.1,2] , [169.65,359.1,0] , [147.25,359.05,1] , [124.85,359,2]];
shapeArrayz[9] = [[274.25,254.15,0] , [274.25,254.2,1] , [274.25,254.25,2] , [274.25,254.25,0] , [264.3,264.275,1] , [254.35,274.3,2] , [254.35,274.3,0] , [231.975,274.3,1] , [209.6,274.3,2] , [209.6,274.3,0] , [199.575,264.25,1] , [189.55,254.2,2] , [189.55,254.2,0] , [231.9,254.175,1] , [274.25,254.15,2]];
shapeArrayz[10] = [[104.8,254.15,0] , [104.8,254.2,1] , [104.8,254.25,2] , [104.8,254.25,0] , [94.85,264.275,1] , [84.9,274.3,2] , [84.9,274.3,0] , [62.525,274.3,1] , [40.15,274.3,2] , [40.15,274.3,0] , [30.125,264.25,1] , [20.1,254.2,2] , [20.1,254.2,0] , [62.45,254.175,1] , [104.8,254.15,2]];
shapeArrayz[11] = [[189.6,169.5,0] , [199.625,159.475,1] , [209.65,149.45,2] , [209.65,149.45,0] , [232.025,149.45,1] , [254.4,149.45,2] , [254.4,149.45,0] , [254.4,149.475,1] , [254.4,149.5,2] , [254.4,149.5,0] , [264.325,159.475,1] , [274.25,169.45,2] , [274.25,169.45,0] , [274.25,169.5,1] , [274.25,169.55,2] , [189.6,169.5,0] , [231.925,169.525,1] , [274.25,169.55,2]];
shapeArrayz[12] = [[20.15,169.5,0] , [30.175,159.475,1] , [40.2,149.45,2] , [40.2,149.45,0] , [62.55,149.45,1] , [84.9,149.45,2] , [84.9,149.45,0] , [84.9,149.475,1] , [84.9,149.5,2] , [84.9,149.5,0] , [94.85,159.475,1] , [104.8,169.45,2] , [104.8,169.45,0] , [104.8,169.5,1] , [104.8,169.55,2] , [20.15,169.5,0] , [62.475,169.525,1] , [104.8,169.55,2]];

And if you need some help to convert this Array into a Flash generated shape ?
here is some code that could help you (AS3):

// draw the new extracted image
function drawArray (_arr:Array) {
	// trace ("drawArray ");
	var _shape:Shape = new Shape();
	_shape.graphics.lineStyle (1, 0x333333, 1);
	_shape.graphics.beginFill (0xcccccc);
	_shape.graphics.moveTo (_arr[0][0], _arr[0][1]); // starting point
	for (var i=1; i<=_arr.length; i+=3) {
		_shape.graphics.curveTo (_arr[i][0], _arr[i][1] , _arr[i+1][0], _arr[i+1][1]);
		// _shape.graphics.lineTo (_arr[i+1][0], _arr[i+1][1]);
	}
	_shape.graphics.endFill ();
	this.drawContainer_mc.addChild (_shape);
}

// jumpstart everything
function init (){	
	for (var j=0; j<shapeArrayz.length; j++) {
		// trace(shapeArrayz[j])
		drawArray (shapeArrayz[j]);
	}
}
init ();

have fun 🙂

Categories
AS3 AS3 migration Flash

From AS2 to AS3 – Where did it go – attachMovie

Where did attachMovie go in AS3?

Once I started using attachMovie instead duplicateMovieClip my AS2 life became a lot easier.

What has the ActionScript 2.0 Migration to say about this subject:

ActionScript 2.0  ActionScript 3.0  Comments
attachMovie() Method Removed In ActionScript 3.0, use addChild() to add child display objects.

Removed… wtf? and you can read the documentation till you are old and gray, but you won’t find a answer there.

In AS2 I know 3 ways to attach a movie to the stage: