Categories
AS3 AS3 migration Flash

From AS2 to AS3 – Where did it go – attachMovie

Where did attachMovie go in AS3?

Once I started using attachMovie instead duplicateMovieClip my AS2 life became a lot easier.

What has the ActionScript 2.0 Migration to say about this subject:

ActionScript 2.0  ActionScript 3.0  Comments
attachMovie() Method Removed In ActionScript 3.0, use addChild() to add child display objects.

Removed… wtf? and you can read the documentation till you are old and gray, but you won’t find a answer there.

In AS2 I know 3 ways to attach a movie to the stage:

Categories
AS3 AS3 migration Flash Open source / Freeware

From AS2 to AS3 – Where did it go – setRGB

Update #1: It seems that .setRGB () has been deprecated in favor of the flash.geom.ColorTransform class. So a little as2 update.

In some cases I can’t help thinking that AS3 hasn’t made our live easier.
The same happened with the change that happened from the AS2 setRGB to AS3.

Specifies an RGB color for a Color object.

setRGB

This is what the ActionScript 2.0 Migration has to say about this:

ActionScript 2.0 ActionScript 3.0 Comments
setRGB() Method flash.geom.ColorTransform.color The RGB color value can be set by using the color accessor property of the ColorTransform class.

ActionScript 2 example code:
[as]
// AS2 Code
var my_color:Color = new Color(my_mc);
my_color.setRGB(0xFF0000); // my_mc turns red
[/as]

Another AS2 example because: “The Color class has been deprecated in favor of the flash.geom.ColorTransform class.”
[as]
// AS2 Code (The Color class has been deprecated in favor of the flash.geom.ColorTransform class.)
import flash.geom.ColorTransform;

var colorTrans:ColorTransform = new ColorTransform();
colorTrans.rgb = 0xFF0000;
var trans:Transform = new Transform( my_mc);
trans.colorTransform = colorTrans;[/as]

and the same code in ActionScript 3:
[as]
// AS3 code
import flash.geom.ColorTransform;

// Changes my_mc’s color to red.
var newColorTransform:ColorTransform = my_mc.transform.colorTransform;
newColorTransform.color = 0xff0000;
my_mc.transform.colorTransform = newColorTransform;
[/as]

More code to write, for something that I don’t use very much. The next time I need to change an Objects color I probably need to search the solution on the web…

No, I going to fix this in a neat little package:
Save this file into: ‘nl.matthijskamstra.utils’
[as]
/**
* Color (AS3), version 1.0
*
* Enter description here
*
*

*  ____                   _      ____ 
* |  __| _ __ ___    ___ | | __ |__  |
* | |   | '_ ` _ \  / __|| |/ /    | |
* | |   | | | | | || (__ |   <     | |
* | |__ |_| |_| |_| \___||_|\_\  __| |
* |____|                        |____|
* 
* 

*
* @class : Color
* @author : Matthijs C. Kamstra [mck]
* @version : 1.0 - class creation (AS3)
* @since : 11-5-2008 0:22
*
*/
package nl.matthijskamstra.utils {

import flash.display.*;
import flash.events.*;
import flash.geom.ColorTransform;

public class Color {

// Constants:
public static var CLASS_REF = nl.matthijskamstra.utils.Color;
public static var CLASS_NAME : String = "Color";
public static var LINKAGE_ID : String = "nl.matthijskamstra.utils.Color";

/**
* Constructor
*
* @usage import nl.matthijskamstra.utils.Color; // import
* var __Color:Color = new Color ( this );
* @param $targetObj a reference to a movie clip or object
*/
public function Color( $targetObj:DisplayObject=null, $colorValue:uint = 0xff3333) {
// trace ( LINKAGE_ID + ' class instantiated');
if ($targetObj == null) { return; }
var newColorTransform:ColorTransform = $targetObj.transform.colorTransform;
newColorTransform.color = $colorValue;
$targetObj.transform.colorTransform = newColorTransform;
}

//////////////////////////////////////// Static ///////////////////////////////////////

static public function setRGB( $targetObj:DisplayObject = null, $colorValue:uint = 0xff3333) {
return new Color ( $targetObj, $colorValue);
}

} // end class

} // end package
[/as]

And now I hope you will never have to look for it again
Happy AS3 😉

Categories
Misc

Upgrading WordPress 2.6

Today I upgraded to WordPress 2.6.

I followed the instructions how to upgrading WordPress and this has never failed… till today 🙁 .

This is what happened: I upgraded and everything was oke. I could login, the upgrading of the database worked fine. I could see my post, pages, etc, etc in the admin and edit them.
So I checked out my homepage: and everything was as it should: mission completed…. NOT!! 🙁

Every link to another page didn’t work, you can navigate by “older post” but not with “recent posts” or the title of the post.

It took me some time to find the correct way to search about this problem: it has something to do with the permalinks. In all cases, these people have permalink structures that contain “index.php”.
Example: “http://www.matthijskamstra.nl/blog/index.php/2008/07/09/drukks-the-selfish-series-drukkgrumm/

Still no idea? Go to your “[your WordPress install]/wp-admin/options-permalink.php” (Customize Permalink Structure) and you will probable see that you don’t have the default setting ( http://www.matthijskamstra.nl/blog/?p=123 :: no “index.php”) but have chosen something else (in my case: [x] Day and name — http://www.matthijskamstra.nl/blog/index.php/2008/07/16/sample-post/ )

I found the explanation here: 2.6 Permalink issues with “index.php” and in my case the second option worked.

2. If you need/want the index.php to be there, then on the Settings->Permalinks screen, add some values in for the category and tag bases. The words “category” and “tag” will do just fine. As long as they are not blank, this should work around the bug.

This is bug in WordPress 2.6, read more about it here: http://trac.wordpress.org/ticket/7306. It will be fixed in the next version (2.6.1)

But for now you can make your WordPress work again: visit your “[your WordPress install]/wp-admin/options-permalink.php” (Customize Permalink Structure) and fill in the two boxes at the bottom with “category” and “tag

happy blogging

Categories
AS3 Flash Open source / Freeware

Lite components from BIT-101: Minimalcomps

Update #1: there has been another update New MinimalComp: WheelNav, but I’m pretty sure I won’t been using this one very much…

I’m using this for some time now, and it’s time to share this with you all: Minimalcomps from BIT-101.

This lite-weight components set is great, I can see what the code is doing, it’s easy to use and its simplicity is beautiful (and I love pixel font in Flash, I should use it more).

Minimal ActionScript 3.0 code only UI components

Do you need some reading material? Some documentation and introduction can be found on Keith Peters (BIT-101) site: read the first post about the Minimalcomps.

But in short:
This are some of the examples (since the first post there are some new components created, but they are not as frequently used as this set);

[swf]http://www.bit-101.com/minimalcomps/ComponentPlayground.swf, 500, 500[/swf]

For lazy readers (and a reminder for myself: the site of BIT-101 doesn’t have a very useful search, and the google code page doesn’t have documentation), here some code to create what you see above not entirely true, but I will keep the code here:
[as collapse=”true”]
var panel:Panel = new Panel(this, stage.stageWidth / 4, stage.stageHeight / 8);
panel.setSize(stage.stageWidth / 2, stage.stageHeight * 3 / 4);

var checkBox:CheckBox = new CheckBox(panel, 20, 20);
checkBox.label = &quot;Check it out!&quot;;

var label:Label = new Label(panel, 20, 40);
label.text = &quot;This is a label&quot;;

var pushbutton:PushButton = new PushButton(panel, 20, 60);
pushbutton.label = &quot;Push Me!&quot;;
pushbutton.width = 100;

var hSlider:HSlider = new HSlider(panel, 20, 90);
var vSlider:VSlider = new VSlider(panel, 130, 20);

var inputText:InputText = new InputText(panel, 20, 110);
inputText.text = &quot;Input Text&quot;;

var _progressBar:ProgressBar = new ProgressBar(panel, 20, 140);

var radio1:RadioButton = new RadioButton(panel, 20, 160);
radio1.label = &quot;Choice 1&quot;;
var radio2:RadioButton = new RadioButton(panel, 20, 180);
radio2.label = &quot;Choice 2&quot;;
var radio3:RadioButton = new RadioButton(panel, 20, 200);
radio3.label = &quot;Choice 3&quot;;

var colorchooser:ColorChooser = new ColorChooser(panel, 20, 230);
colorchooser.value = 0xff0000;
[/as]

This is the code you want to use, to create all the components (minus wheelnav… ) in a document class.
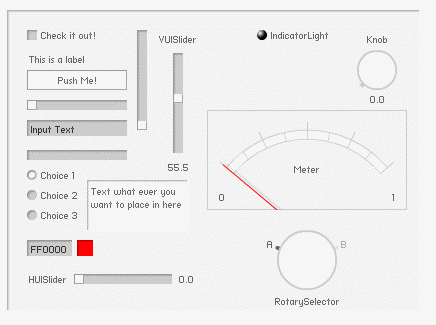
MinimalComps collection
[as]
package
{
import com.bit101.components.*;
import flash.display.*;
import flash.events.*;

/**
* @author Matthijs Kamstra aka [mck]
*/
public class MainCube extends MovieClip
{

public function MainCube():void
{
trace( &quot;MainCube.MainCube&quot; );

var panel:Panel = new Panel(this, 20, 20);
panel.setSize(stage.stageWidth * .75, stage.stageHeight * .75);

var _CheckBox:CheckBox = new CheckBox(panel, 20, 20, &quot;Check it out!&quot;);

var _Label:Label = new Label(panel, 20, 40, &quot;This is a label&quot;);

var _PushButton:PushButton = new PushButton(panel, 20, 60, &quot;Push Me!&quot;);
_PushButton.width = 100;

var _HSlider:HSlider = new HSlider(panel, 20, 90);
var _VSlider:VSlider = new VSlider(panel, 130, 20);

var _VUISlider:VUISlider = new VUISlider(panel, 150, 20, ‘VUISlider’);
_VUISlider.value = 55.5;
var _HUISlider:HUISlider = new HUISlider (panel, 20, 260, ‘HUISlider’);

var _InputText:InputText = new InputText(panel, 20, 110, &quot;Input Text&quot;);

var _ProgressBar:ProgressBar = new ProgressBar(panel, 20, 140);
//trace( &quot;_ProgressBar.maximum : &quot; + _ProgressBar.maximum );
_ProgressBar.value = .75;

var radio1:RadioButton = new RadioButton(panel, 20, 160, &quot;Choice 1&quot;, true);
var radio2:RadioButton = new RadioButton(panel, 20, 180, &quot;Choice 2&quot;);
var radio3:RadioButton = new RadioButton(panel, 20, 200, &quot;Choice 3&quot;);

var _ColorChooser:ColorChooser = new ColorChooser(panel, 20, 230, 0xff0000);

var _IndicatorLight:IndicatorLight = new IndicatorLight (panel, 250, 20, 0xff00ff, &quot;IndicatorLight&quot;);

var _Knob:Knob = new Knob (panel, 350, 20, &quot;Knob&quot;);

var _Meter:Meter = new Meter (panel, 200, 100, &quot;Meter&quot;);

var _RotarySelector:RotarySelector = new RotarySelector (panel, 270, 220, &quot;RotarySelector&quot;);

var _Text:Text = new Text (panel, 80, 170, &quot;Text what ever you want to place in here&quot;);
_Text.setSize (100, 50);

}

} // end class

} // end package
[/as]

And it quite easy to create buttons:
[as]
var myButton:PushButton = new PushButton(this, 10, 20, onClick);
function onClick (e:Event){
trace (‘onClick’);
// do something else
}
[/as]

You can download the MinimalComps set at: http://code.google.com/p/minimalcomps/
The set includes a CheckBox, PushButton, HSlider, VSlider, InputText, ProgressBar, RadioButton, ColorChooser (text input only) and Panel.

One big fat tip from me:
in the zip you will find a folder named ‘assets’ and in there is a truetype font called ‘pf_ronda_seven.ttf‘. You need to install that on your computer (Windows: C:\WINDOWS\Fonts , Apple: ??) and add it to your Flash file.

How to add a font to the Flash Library

Goto your library, add a “New Font”
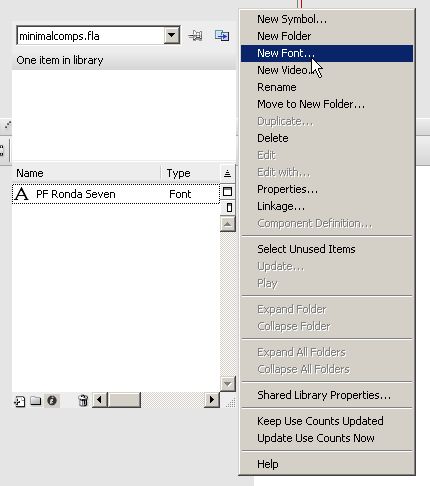
Library add New Font
(sorry for the strange looking Flash, it has something to do with my screenshot programm)

Name: “PF Ronda Seven” (you need to spell this exactly as here, without the quotes (“))
Font: search for “PF Ronda Seven”, if you can’t find it, you probably need to restart Flash.
Size: 10
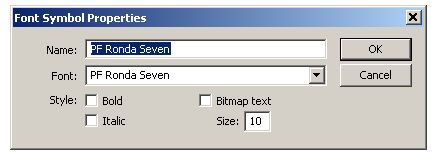
Font Symbol screen
(use this screenshot as an example if you don’t know what I mean)

You need to embed the font from the library into the .FLA : search the font you just created in the library and Right Click >> choose Linkage. Just check “Export for Actionscript” (“Export in first frame” will be activated to). I didn’t change anything, press “OK”
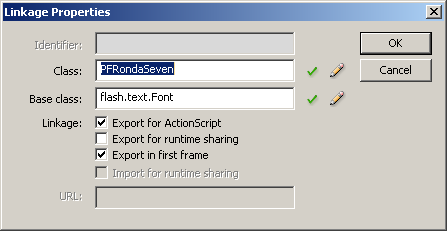
and you done!

Categories
Design Drukk Urban papercraft

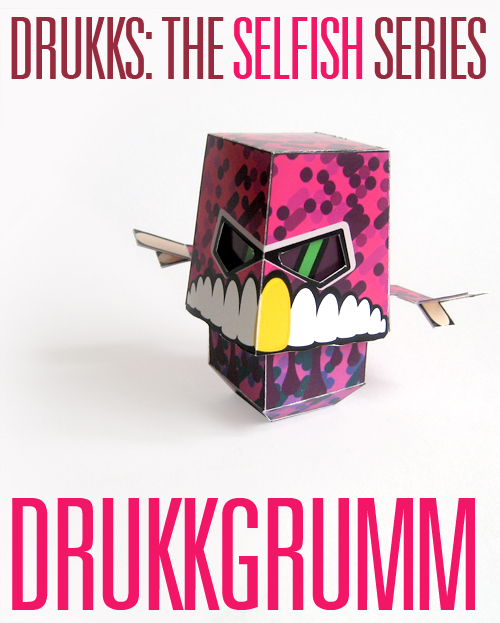
Drukks: the Selfish Series – DrukkGrumm

The Selfish Series and the (designers) Pusher Series now have there own homepage!

Today I present the last Drukk model in the Selfish Series: DrukkGrumm.

Drukks: the Selfish Series

Drukk is a simple papertoy (easy to build, easy to customize) with moving parts (you could call it a paper automata).

Download DrukkGrumm:

(The .ZIP file contains a .PDF)

Do you feel inspired by this model? Create your own Drukk, send it to me, and be part of the first “Pusher Series”.
Download the blank Drukk template:

(The .ZIP file contains a .PDF)

I have created 4 models to get you all inspired.
Every Wednesday, for 4 weeks long, I will post a new Drukk from the Selfish Series.
This is the last model from a 4 models series.

All models from the first Selfish Series are released!
You can download them here:
DrukkChubby
Burdd
Speakurr
DrukkGrumm

and don’t forget: You can create a Drukk too! You can participate in the Pusher Series (just download the blank template and get busy).

On a more personal note.
I love this model: nice colors, nice attitude. So if you just want to download 1 model, download this model

Categories
Design Drukk Urban papercraft

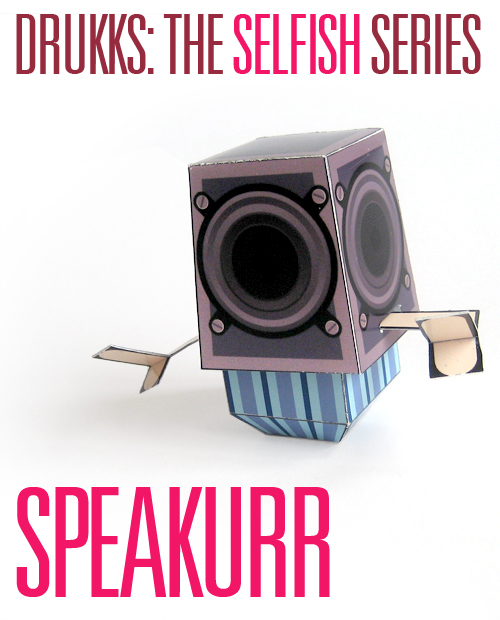
Drukks: the Selfish Series – Speakurr

The Selfish Series and the (designers) Pusher Series now have there own homepage!

Today I present the third Drukk model in the Selfish Series: Speakurr.

Drukks: the Selfish Series

Drukk is a simple papertoy (easy to build, easy to customize) with moving parts (you could call it a paper automata).

Download Speakurr:

(The .ZIP file contains a .PDF)

Do you feel inspired by this model? Create your own Drukk, send it to me, and be part of the first “Pusher Series”.
Download the blank Drukk template:

(The .ZIP file contains a .PDF)

I have created 4 models to get you all inspired.
Every Wednesday, for 4 weeks long, I will post a new Drukk from the Selfish Series.
This is the third model in a series of four.

All models from the first Selfish Series are released!
You can download them here:
DrukkChubby
Burdd
Speakurr
DrukkGrumm

and don’t forget: You can create a Drukk too! You can participate in the Pusher Series (just download the blank template and get busy).

On a more personal note.
I always wanted to do something with speakers… so here it is.

Categories
Design Drukk Urban papercraft

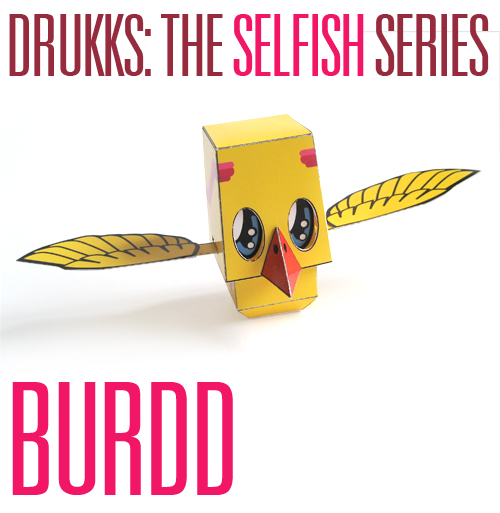
Drukks: the Selfish Series – Burdd

The Selfish Series and the (designers) Pusher Series now have there own homepage!

Today I present the second Drukk model in the Selfish Series: Burdd.

Drukks: the Selfish Series

Drukk is a simple papertoy (easy to build, easy to customize) with moving parts (you could call it a paper automata).

Download Burdd:

(The .ZIP file contains a .PDF)

Do you feel inspired by this model? Create your own Drukk, send it to me, and be part of the first “Pusher Series”.
Download the blank Drukk template:

(The .ZIP file contains a .PDF)

I have created 4 models to get you all inspired.
Every Wednesday, for 4 weeks long, I will post a new Drukk from the Selfish Series.
This is the second model from a series of 4.

All models from the first Selfish Series are released!
You can download them here:
DrukkChubby
Burdd
Speakurr
DrukkGrumm

and don’t forget: You can create a Drukk too! You can participate in the Pusher Series (just download the blank template and get busy).

On a more personal note.
My girl “complained” that the skins that I create for myself or others are never cute! That’s correct! So now a cute little yellow bird 😉

Categories
Design Drukk Urban papercraft

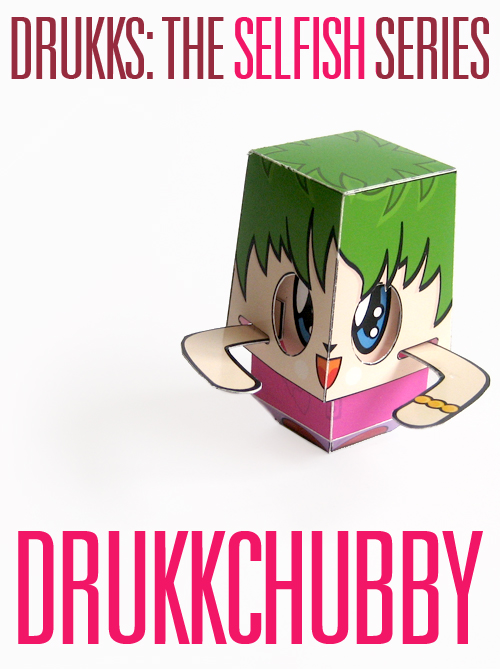
Drukks: the Selfish Series – DrukkChubby

The Selfish Series and the (designers) Pusher Series now have there own homepage!

Today I present the first Drukk model in the Selfish Series: DrukkChubby

Drukks: the Selfish Series

Drukk is a simple papertoy (easy to build, easy to customize) with moving parts (you could call it a paper automata).

Download DrukkChubby:

(The .ZIP file contains a .PDF)

Do you feel inspired by this model? Create your own Drukk, send it to me, and be part of the first “Pusher Series”.
Download the blank Drukk template:

(The .ZIP file contains a .PDF)

I have created 4 models to get you all inspired.
Every Wednesday, for 4 weeks long, I will post a new Drukk from the Selfish Series.
This is the first model in a series of 4.

All models from the first Selfish Series are released!
You can download them here:
DrukkChubby
Burdd
Speakurr
DrukkGrumm

and don’t forget: You can create a Drukk too! You can participate in the Pusher Series (just download the blank template and get busy).

On a more personal note.
My girl “complained” about the skins that I create for my own models and the customs that I create: and she is correct, my skins are never cute or lovely… So here my first cute design 😉

Categories
Design Drukk Urban papercraft

Drukks: the Selfish Series

A while back I mentioned that I was working on a new papertoy called Drukk

drukk: new papertoy by Matthijs Kamstra aka [mck]

Drukk is a simple papertoy (easy to build, easy to customize) with moving parts (you could call it a paper automata). So if you are not in the mood to build/customize a more complex model like Grumm you should give Drukk a try.

I have been working on 4 models to get you all inspired to build and create new Drukks 😉 .

Me, Myself And I

Every Wednesday, for 4 weeks long, I will post a new Drukk from the Selfish Series.

But today I’ll start this Selfish Series with a blank Drukk template (because every really good papertoy series has a blank version) which will be used in the “Pusher Series”:

(The .ZIP file contains a .PDF)

Special thx to some of the friendly people at nicePaperToys who gave me feedback about the build and the model itself.

Tomorrow more….

Categories
Misc

WordPress 2.5 image upload error

I couldn’t upload images since I upgraded to WordPress 2.5.
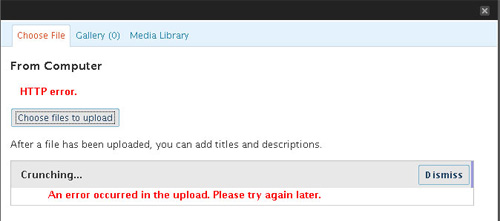
All I got was an HTTP error, very strange.

WordPress 2.5 - image uplaod - HTTP error

I hoped that the WordPress 2.5.1 update would fix this problem, but it didn’t.
Luckily there are people who also had this problem, and know who to fix it:
wordpress 25 image upload error wordpress fix

I can’t explain what it does, but now I can upload images again 🙂