Categories
AS3 AS3 migration Flash

From AS2 to AS3 – Where did it go – swapDepths

Where did swapDepths () go in AS3?

This is what the ActionScript 2.0 Migration has to say about this:

ActionScript 2.0  ActionScript 3.0  Comments
swapDepths() Method Removed In ActionScript 3.0, you can achieve similar functionality by using the methods of the DisplayObjectContainer class, such as the addChildAt(), setChildIndex(), swapChildren(), and swapChildrenAt() methods.

Removed… bummer, so with what do I replace it with…

In AS2 you can use swapDepths() in two ways:

  • A Number that specifies the depth level where the movie clip is to be placed.
  • An instance name that specifies the movie clip instance whose depth is swapped with the movie clip for which the method is being applied. Both movie clips must have the same parent movie clip.

In the examples there are two movieClips: ‘circle_mc‘ and ‘square_mc‘. Movieclip square_mc is under circle_mc (z-index is lower then circle_mc). And the task is to get square_mc above circle_mc.

AS 2

There are a couple of ways to do that in ActionScript 2:

Example #1
Swap the depth of two movieclips which each other (square_mc will be placed on the depth of circle_mc, and the other way around)
this.square_mc.swapDepths(this.circle_mc);

Example #2
I consider this a hack, but one that works
this.square_mc.swapDepths(1000000);

Example #3
When you want to change the depth of something, this is usually to place it on top:
this.square_mc.swapDepths(this.getNextHighestDepth());

AS 3

Lets try this in ActionScript 3:

Example #1
this.swapChildren(square_mc, circle_mc);
Visit livedocs at the Adobe site for more information and example code
[as]
var square = this.getChildByName (‘square_mc’);
var circle = this.getChildByName (‘circle_mc’);

trace(this.getChildAt(0).name); // square_mc
trace(this.getChildAt(1).name); // circle_mc

this.swapChildren(square as DisplayObject, circle as DisplayObject);

trace(this.getChildAt(0).name); // circle_mc
trace(this.getChildAt(1).name); // square_mc
[/as]

Example #2
not possible anymore… if you want a detailed explanation visit dreaming in Flash blog, and read more about swapDepths() in AS3 (it’s explained with a image)

Example #3
To place a movieclip on the highest depth in actionscript2, we will use MovieClip.getNextHighestDepth,
but in AS3 that function is removed ๐Ÿ™

In AS3 you need to use numChildren:
this.setChildIndex ( square_mc , this.numChildren - 1 );
Visit livedocs at the Adobe site for more information and example code

I realize that this is not a complete explanation… but I hope this is a starting point to find old function that you used in AS2

Categories
Uncategorized

FlashDevelop 3.0.0 Beta8 released

I normally don’t regurgitate information of the internet, but this is a program that I use every day.

First I worked with SE|PY, but that project never made it to AS3…. sadly, I really loved that program and one of the reason was that it was build in python and so it was possible to run on OSX, Linux and Windows.
When I started to program AS3, I needed a tool to help me code nicely: FlashDevelop. It runs on .NET so it works only on Windows, but I love this program!

So here a little info from its creator (Mika):

This release is long overdue but there were a few issues that we wanted to resolve and then there were summer vacations… ๐Ÿ™‚
There are quite a lot of new features and really nice stability improvements, we hope that all of you enjoy this release!

Read more about this release.

Categories
AS3 Custmm Grumm Extending Flash Grumm Urban papercraft

Custmm Grumm – AI 2 Array

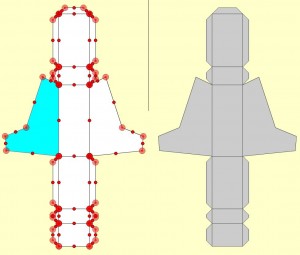
Another experiment towards Custmm Grumm. This time my task was to export/import an Illustrator file to Flash…

Yeah, yeah; I know: you say “import to stage” … correct! ๐Ÿ˜‰
But what I need is the shape converted to code (coordinates in the x-direction and y-direction)..
Ha, you stopped grinning!

Well the first part is correct.
You need to import the file to the stage and give every imported shape it’s own layer.
This is something that you don’t want to do by hand (I didn’t want to ๐Ÿ˜‰ ), so I wrote a jsfl that fixes that for you (read my post about it here: object-to-layer-jsfl)

After that you need to extract the values (x and y-positions form the corners of the shapes) of the files. Some thing, you don’t want that to do by hand: I have written a jsfl who does that. (read more about that here: shape-2-array-jsfl )

If you use these two scripts, you get: all imported shapes in different layers, and you can extract all values.
Example of the array:
[as]
var shapeArrayz:Array = new Array ();
shapeArrayz[0] = [[20.05,169.5,0] , [62.425,169.5,1] , [104.8,169.5,2] , [104.8,169.5,0] , [104.8,211.85,1] , [104.8,254.2,2] , [104.8,254.2,0] , [62.425,254.2,1] , [20.05,254.2,2] , [20.05,254.2,0] , [20.05,211.85,1] , [20.05,169.5,2]];
// etc…
[/as]
This array off point can be used to generate the shape you just “traced”.

Generated shapes from an Array

This script (below) is used to generate the points (every line has 3 points, the beginning, the end and one inbetween), and the generated shape on the right side (no points, only the shape):
[as]
var shapeArray:Array = [];

// visualize the points
function createPoints2 (_pointArray:Array) {
shapeArray = [];
var point:MovieClipInLibraryWithLinkageName;
for (var i=0; i<_pointArray.length; i++) {
point = new MovieClipInLibraryWithLinkageName();
point.x = _pointArray[i][0];
point.y = _pointArray[i][1];
var switchExpression:uint = _pointArray[i][2];
switch (switchExpression) {
case 0 :
//trace (0);
point.alpha = .5;
shapeArray.push ([_pointArray[i][0],_pointArray[i][1]]);
break;
case 1 :
//trace (1);
point.scaleX = point.scaleY = .5;
break;
case 2 :
//trace (2);
point.alpha = .5;
point.scaleX = point.scaleY = .3;
break;
default :
trace ("Not 0, 1, or 2");
}
addChild (point);
}

}

// draw the new extracted image
function drawArray (_arr:Array) {
// trace ("drawArray ");
var _shape:Shape = new Shape();
_shape.graphics.lineStyle (1, 0x333333, 1);
_shape.graphics.beginFill (0xcccccc);
_shape.graphics.moveTo (_arr[0][0], _arr[0][1]); // starting point
for (var i=1; i<=_arr.length; i+=3) {
_shape.graphics.curveTo (_arr[i][0], _arr[i][1] , _arr[i+1][0], _arr[i+1][1]);
// _shape.graphics.lineTo (_arr[i+1][0], _arr[i+1][1]);
}
_shape.graphics.endFill ();
this.drawContainer_mc.addChild (_shape);
}

// jumpstart everything
function init (){
for (var j=0; j<shapeArrayz.length; j++) {
// trace(shapeArrayz[j])
createPoints2 (shapeArrayz[j]);
drawArray (shapeArrayz[j]);
}
}
init ();

[/as]

Update #1: I previously used point_mc in the code. That was a movieClip in the library with a linkage name. I changed it in the code, I hope that helps.

Eventually I will use the points, and generated shapes to modify the shape (move a point, create a new shape) and/or to add points.

Categories
AS3 Extending Flash Flash

Shape 2 Array jsfl

For a project of mine: Custmm Grumm I needed to change a shape into an array, you could say that I needed to change a Illustrator/vector file into code.

As far as I know there is no other method then the one I created here with jsfl.

To make this happen I imported the .AI file (Illustrator) to the stage.
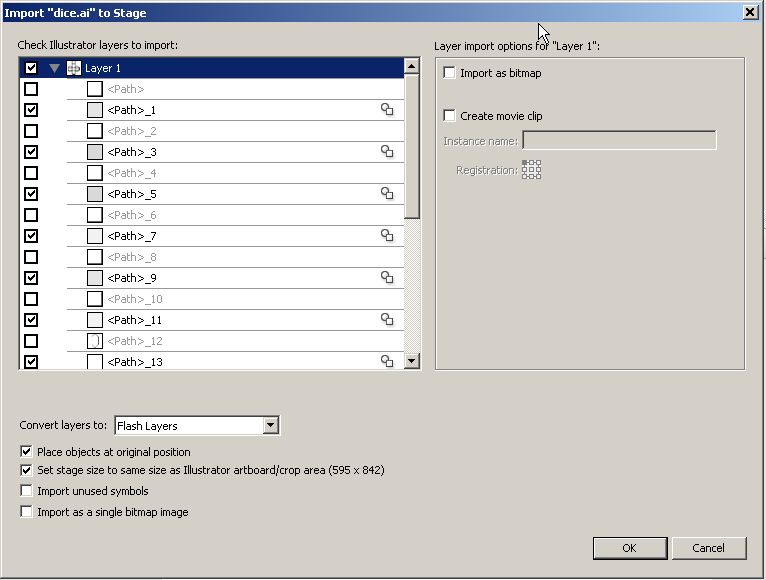
Flash import screen

This JSFL files has some restrictions, you can read it in the comments:

this script only works under certain conditions:
– everything that is selected must be shapes, if not, this doesn’t work (select all and ctrl+b (break))
– every shape has to be in a different layer, otherwise the script see it as one shape

The result of this jsfl is not always what you expect…
sometimes geometric shapes like squares/rectangles/triangles are all f#$%ed-up (it looks like curves are made to opposite corners)
I have no solution for that in this jsfl (in the code), it seems that Flash ‘reads’ the shape wrong (or in the wrong order)…
But you could try:

  • I used the straighten tool which worked in one case, but not in the other
  • rotated a square 90 degrees
  • both solutions

I’m not making an install file, so if you want to try this script you need to copy it in the correct directory (I’m sorry for the OsX users: I have no idea, but if you do, place a comment)
Windows (on my computer): C:\Documents and Settings\[here you name]\Local Settings\Application Data\Adobe\Flash CS3\en\Configuration\Commands

here is the JSFL (if you need to give it a name; I have a suggestion: “[mck] shape2array 2.jsfl”)

/**
*
* this script only works under certain conditions:
*		- everything that is selected must be shapes, if not, this doesn't work (select all and ctrl+b (break))
* 		- every shape has to be in a different layer, otherwise the script see it as one shape 
*
* The result of this jsfl is not always what you expect...
* 		sometimes geometric shapes like squares/rectangles/triangles are all f#$%ed-up (it looks like curves are made to opposite corners)
* 		I have no solution for that in this jsfl (in the code), it seems that Flash 'reads' the shape wrong (or in the wrong order)... 
*		But you could try: 	- I used the straighten tool which worked in one case, but not in the other 
*						- rotated a square 90 degrees 
*						- both solutions 
*
*
* 
* based upon 		http://ericlin2.tripod.com/bugwire/bugwiret.html
* and			http://livedocs.adobe.com/flash/9.0/main/wwhelp/wwhimpl/common/html/wwhelp.htm?context=LiveDocs_Parts&file=00003869.html
*
* <pre>
*  ____                   _      ____
* |  __| _ __ ___    ___ | | __ |__  |
* | |   | '_ ` _ \  / __|| |/ /    | |
* | |   | | | | | || (__ |   <     | |
* | |__ |_| |_| |_| \___||_|\_\  __| |
* |____|                        |____|
*
* </pre>
*
*
* @author			Matthijs C. Kamstra [mck]
* @version		1.1
* @since			10:00 5-5-2008
*
* Changelog:
* 		v1.1 [2008-05-09] - test movie after use of this jsfl
* 		v1.0 [2008-05-05] - Initial release
*
*
*/
var currentVersion = '1.1';

fl.trace ('[mck] shape2Array :: version ' + currentVersion);

// with a shape selected
var ptArray = [];
var doneEdge = [];
var exportString = 'var shapeArrayz:Array = new Array ();\n';
var selectionNumber = 0;

// fl.trace("// start ---------------------------");
function isDrawn(id) {
	for (var k = 0; k<doneEdge.length; k++) {
		if (doneEdge[k] == id) {
			return true;
		}
	}
	return false;
}


sel = fl.getDocumentDOM().selection;
for (var n = 0; n < sel.length; n++) {

	exportString += 'shapeArrayz['+n+'] = [';
	selectionNumber = sel.length;
	
	var elt = sel[n];
	if (elt.elementType != 'shape') {
		continue;
	}
	elt.beginEdit();
	for (i=0; i<elt.contours.length; i++) {
		var cont = elt.contours[i];
		var he = cont.getHalfEdge();
		var startId = he.id;
		var id = 0;
		while (id != startId) {
			var ed = he.getEdge();
			if (!isDrawn(ed.id)) {
				doneEdge.push(ed.id);
				for (var j = 0; j<3; j++) {
					var pt = ed.getControl(j);
					ptArray.push(pt.x, pt.y , j);
					exportString += '[' + pt.x + ',' + pt.y + ',' + j + '] , ';
				}
			}
			he = he.getNext();
			id = he.id;
		}
	}
	elt.endEdit();
	exportString += '];\n';
}
// fl.trace(ptArray);
// fl.trace("// end ---------------------------");


// I'm a lazy bastard, so paste the code in the as layer
// create or place code in 'as' layer
var tl = fl.getDocumentDOM().getTimeline();
if (tl.findLayerIndex("as") == undefined){
	tl.addNewLayer('as', 'normal' , true); 
} else {
	tl.currentLayer = tl.findLayerIndex("as")[0];
}
tl.layers[tl.currentLayer].frames[0].actionScript = exportString.split('] , ];').join(']];') + "\n";

// The following example tests the movie for the current document:
fl.getDocumentDOM().testMovie(); // if you don't want to export to swf after the jsfl is ready, comment this line


// end jsfl

It will create a layer named ‘as’ where the array will be placed that will look something like this:

var shapeArrayz:Array = new Array ();
shapeArrayz[0] = [[20.05,169.5,0] , [62.425,169.5,1] , [104.8,169.5,2] , [104.8,169.5,0] , [104.8,211.85,1] , [104.8,254.2,2] , [104.8,254.2,0] , [62.425,254.2,1] , [20.05,254.2,2] , [20.05,254.2,0] , [20.05,211.85,1] , [20.05,169.5,2]];
shapeArrayz[1] = [[189.55,0,0] , [189.55,42.35,1] , [189.55,84.7,2] , [189.55,84.7,0] , [147.175,84.7,1] , [104.8,84.7,2] , [104.8,84.7,0] , [104.8,42.35,1] , [104.8,0,2] , [104.8,0,0] , [147.175,0,1] , [189.55,0,2]];
shapeArrayz[2] = [[189.55,169.45,0] , [231.9,169.45,1] , [274.25,169.45,2] , [274.25,169.45,0] , [274.25,211.8,1] , [274.25,254.15,2] , [274.25,254.15,0] , [231.9,254.15,1] , [189.55,254.15,2] , [189.55,254.15,0] , [189.55,211.8,1] , [189.55,169.45,2]];
shapeArrayz[3] = [[189.55,84.7,0] , [189.55,127.075,1] , [189.55,169.45,2] , [189.55,169.45,0] , [147.175,169.45,1] , [104.8,169.45,2] , [104.8,169.45,0] , [104.8,127.075,1] , [104.8,84.7,2] , [104.8,84.7,0] , [147.175,84.7,1] , [189.55,84.7,2]];
shapeArrayz[4] = [[104.8,169.45,0] , [147.175,169.45,1] , [189.55,169.45,2] , [189.55,169.45,0] , [189.55,211.8,1] , [189.55,254.15,2] , [189.55,254.15,0] , [147.175,254.15,1] , [104.8,254.15,2] , [104.8,254.15,0] , [104.8,211.8,1] , [104.8,169.45,2]];
shapeArrayz[5] = [[104.8,338.95,0] , [104.8,296.55,1] , [104.8,254.15,2] , [104.8,254.15,0] , [147.175,254.15,1] , [189.55,254.15,2] , [189.55,254.15,0] , [189.55,296.55,1] , [189.55,338.95,2] , [189.55,338.95,0] , [147.175,338.95,1] , [104.8,338.95,2]];
shapeArrayz[6] = [[274.25,169.5,0] , [284.275,179.5,1] , [294.3,189.5,2] , [294.3,189.5,0] , [294.3,211.9,1] , [294.3,234.3,2] , [294.3,234.3,0] , [294.275,234.3,1] , [294.25,234.3,2] , [294.25,234.3,0] , [284.325,244.25,1] , [274.4,254.2,2] , [274.4,254.2,0] , [274.325,254.2,1] , [274.25,254.2,2] , [274.25,254.2,0] , [274.25,211.85,1] , [274.25,169.5,2]];
shapeArrayz[7] = [[0.1,189.45,0] , [10.1,179.45,1] , [20.1,169.45,2] , [20.15,254.2,0] , [20.125,211.825,1] , [20.1,169.45,2] , [20.15,254.2,0] , [20.1,254.2,1] , [20.05,254.2,2] , [20.05,254.2,0] , [10.025,244.2,1] , [0,234.2,2] , [0,234.2,0] , [0.05,211.825,1] , [0.1,189.45,2]];
shapeArrayz[8] = [[124.85,359,0] , [114.825,349,1] , [104.8,339,2] , [189.55,338.85,0] , [147.175,338.925,1] , [104.8,339,2] , [189.55,338.85,0] , [189.55,338.925,1] , [189.55,339,2] , [189.55,339,0] , [179.6,349.05,1] , [169.65,359.1,2] , [169.65,359.1,0] , [147.25,359.05,1] , [124.85,359,2]];
shapeArrayz[9] = [[274.25,254.15,0] , [274.25,254.2,1] , [274.25,254.25,2] , [274.25,254.25,0] , [264.3,264.275,1] , [254.35,274.3,2] , [254.35,274.3,0] , [231.975,274.3,1] , [209.6,274.3,2] , [209.6,274.3,0] , [199.575,264.25,1] , [189.55,254.2,2] , [189.55,254.2,0] , [231.9,254.175,1] , [274.25,254.15,2]];
shapeArrayz[10] = [[104.8,254.15,0] , [104.8,254.2,1] , [104.8,254.25,2] , [104.8,254.25,0] , [94.85,264.275,1] , [84.9,274.3,2] , [84.9,274.3,0] , [62.525,274.3,1] , [40.15,274.3,2] , [40.15,274.3,0] , [30.125,264.25,1] , [20.1,254.2,2] , [20.1,254.2,0] , [62.45,254.175,1] , [104.8,254.15,2]];
shapeArrayz[11] = [[189.6,169.5,0] , [199.625,159.475,1] , [209.65,149.45,2] , [209.65,149.45,0] , [232.025,149.45,1] , [254.4,149.45,2] , [254.4,149.45,0] , [254.4,149.475,1] , [254.4,149.5,2] , [254.4,149.5,0] , [264.325,159.475,1] , [274.25,169.45,2] , [274.25,169.45,0] , [274.25,169.5,1] , [274.25,169.55,2] , [189.6,169.5,0] , [231.925,169.525,1] , [274.25,169.55,2]];
shapeArrayz[12] = [[20.15,169.5,0] , [30.175,159.475,1] , [40.2,149.45,2] , [40.2,149.45,0] , [62.55,149.45,1] , [84.9,149.45,2] , [84.9,149.45,0] , [84.9,149.475,1] , [84.9,149.5,2] , [84.9,149.5,0] , [94.85,159.475,1] , [104.8,169.45,2] , [104.8,169.45,0] , [104.8,169.5,1] , [104.8,169.55,2] , [20.15,169.5,0] , [62.475,169.525,1] , [104.8,169.55,2]];

And if you need some help to convert this Array into a Flash generated shape ?
here is some code that could help you (AS3):

// draw the new extracted image
function drawArray (_arr:Array) {
	// trace ("drawArray ");
	var _shape:Shape = new Shape();
	_shape.graphics.lineStyle (1, 0x333333, 1);
	_shape.graphics.beginFill (0xcccccc);
	_shape.graphics.moveTo (_arr[0][0], _arr[0][1]); // starting point
	for (var i=1; i<=_arr.length; i+=3) {
		_shape.graphics.curveTo (_arr[i][0], _arr[i][1] , _arr[i+1][0], _arr[i+1][1]);
		// _shape.graphics.lineTo (_arr[i+1][0], _arr[i+1][1]);
	}
	_shape.graphics.endFill ();
	this.drawContainer_mc.addChild (_shape);
}

// jumpstart everything
function init (){	
	for (var j=0; j<shapeArrayz.length; j++) {
		// trace(shapeArrayz[j])
		drawArray (shapeArrayz[j]);
	}
}
init ();

have fun ๐Ÿ™‚

Categories
AS3 AS3 migration Flash Open source / Freeware

From AS2 to AS3 – Where did it go – setRGB

Update #1: It seems that .setRGB () has been deprecated in favor of the flash.geom.ColorTransform class. So a little as2 update.

In some cases I can’t help thinking that AS3 hasn’t made our live easier.
The same happened with the change that happened from the AS2 setRGB to AS3.

Specifies an RGB color for a Color object.

setRGB

This is what the ActionScript 2.0 Migration has to say about this:

ActionScript 2.0 ActionScript 3.0 Comments
setRGB() Method flash.geom.ColorTransform.color The RGB color value can be set by using the color accessor property of the ColorTransform class.

ActionScript 2 example code:
[as]
// AS2 Code
var my_color:Color = new Color(my_mc);
my_color.setRGB(0xFF0000); // my_mc turns red
[/as]

Another AS2 example because: “The Color class has been deprecated in favor of the flash.geom.ColorTransform class.”
[as]
// AS2 Code (The Color class has been deprecated in favor of the flash.geom.ColorTransform class.)
import flash.geom.ColorTransform;

var colorTrans:ColorTransform = new ColorTransform();
colorTrans.rgb = 0xFF0000;
var trans:Transform = new Transform( my_mc);
trans.colorTransform = colorTrans;[/as]

and the same code in ActionScript 3:
[as]
// AS3 code
import flash.geom.ColorTransform;

// Changes my_mc’s color to red.
var newColorTransform:ColorTransform = my_mc.transform.colorTransform;
newColorTransform.color = 0xff0000;
my_mc.transform.colorTransform = newColorTransform;
[/as]

More code to write, for something that I don’t use very much. The next time I need to change an Objects color I probably need to search the solution on the web…

No, I going to fix this in a neat little package:
Save this file into: ‘nl.matthijskamstra.utils’
[as]
/**
* Color (AS3), version 1.0
*
* Enter description here
*
*

*  ____                   _      ____ 
* |  __| _ __ ___    ___ | | __ |__  |
* | |   | '_ ` _ \  / __|| |/ /    | |
* | |   | | | | | || (__ |   <     | |
* | |__ |_| |_| |_| \___||_|\_\  __| |
* |____|                        |____|
* 
* 

*
* @class : Color
* @author : Matthijs C. Kamstra [mck]
* @version : 1.0 - class creation (AS3)
* @since : 11-5-2008 0:22
*
*/
package nl.matthijskamstra.utils {

import flash.display.*;
import flash.events.*;
import flash.geom.ColorTransform;

public class Color {

// Constants:
public static var CLASS_REF = nl.matthijskamstra.utils.Color;
public static var CLASS_NAME : String = "Color";
public static var LINKAGE_ID : String = "nl.matthijskamstra.utils.Color";

/**
* Constructor
*
* @usage import nl.matthijskamstra.utils.Color; // import
* var __Color:Color = new Color ( this );
* @param $targetObj a reference to a movie clip or object
*/
public function Color( $targetObj:DisplayObject=null, $colorValue:uint = 0xff3333) {
// trace ( LINKAGE_ID + ' class instantiated');
if ($targetObj == null) { return; }
var newColorTransform:ColorTransform = $targetObj.transform.colorTransform;
newColorTransform.color = $colorValue;
$targetObj.transform.colorTransform = newColorTransform;
}

//////////////////////////////////////// Static ///////////////////////////////////////

static public function setRGB( $targetObj:DisplayObject = null, $colorValue:uint = 0xff3333) {
return new Color ( $targetObj, $colorValue);
}

} // end class

} // end package
[/as]

And now I hope you will never have to look for it again
Happy AS3 ๐Ÿ˜‰

Categories
AS3 Flash Open source / Freeware

Lite components from BIT-101: Minimalcomps

Update #1: there has been another update New MinimalComp: WheelNav, but I’m pretty sure I won’t been using this one very much…

I’m using this for some time now, and it’s time to share this with you all: Minimalcomps from BIT-101.

This lite-weight components set is great, I can see what the code is doing, it’s easy to use and its simplicity is beautiful (and I love pixel font in Flash, I should use it more).

Minimal ActionScript 3.0 code only UI components

Do you need some reading material? Some documentation and introduction can be found on Keith Peters (BIT-101) site: read the first post about the Minimalcomps.

But in short:
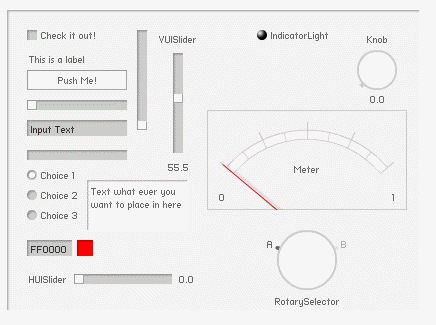
This are some of the examples (since the first post there are some new components created, but they are not as frequently used as this set);

[swf]http://www.bit-101.com/minimalcomps/ComponentPlayground.swf, 500, 500[/swf]

For lazy readers (and a reminder for myself: the site of BIT-101 doesn’t have a very useful search, and the google code page doesn’t have documentation), here some code to create what you see above not entirely true, but I will keep the code here:
[as collapse=”true”]
var panel:Panel = new Panel(this, stage.stageWidth / 4, stage.stageHeight / 8);
panel.setSize(stage.stageWidth / 2, stage.stageHeight * 3 / 4);

var checkBox:CheckBox = new CheckBox(panel, 20, 20);
checkBox.label = &quot;Check it out!&quot;;

var label:Label = new Label(panel, 20, 40);
label.text = &quot;This is a label&quot;;

var pushbutton:PushButton = new PushButton(panel, 20, 60);
pushbutton.label = &quot;Push Me!&quot;;
pushbutton.width = 100;

var hSlider:HSlider = new HSlider(panel, 20, 90);
var vSlider:VSlider = new VSlider(panel, 130, 20);

var inputText:InputText = new InputText(panel, 20, 110);
inputText.text = &quot;Input Text&quot;;

var _progressBar:ProgressBar = new ProgressBar(panel, 20, 140);

var radio1:RadioButton = new RadioButton(panel, 20, 160);
radio1.label = &quot;Choice 1&quot;;
var radio2:RadioButton = new RadioButton(panel, 20, 180);
radio2.label = &quot;Choice 2&quot;;
var radio3:RadioButton = new RadioButton(panel, 20, 200);
radio3.label = &quot;Choice 3&quot;;

var colorchooser:ColorChooser = new ColorChooser(panel, 20, 230);
colorchooser.value = 0xff0000;
[/as]

This is the code you want to use, to create all the components (minus wheelnav… ) in a document class.
MinimalComps collection
[as]
package
{
import com.bit101.components.*;
import flash.display.*;
import flash.events.*;

/**
* @author Matthijs Kamstra aka [mck]
*/
public class MainCube extends MovieClip
{

public function MainCube():void
{
trace( &quot;MainCube.MainCube&quot; );

var panel:Panel = new Panel(this, 20, 20);
panel.setSize(stage.stageWidth * .75, stage.stageHeight * .75);

var _CheckBox:CheckBox = new CheckBox(panel, 20, 20, &quot;Check it out!&quot;);

var _Label:Label = new Label(panel, 20, 40, &quot;This is a label&quot;);

var _PushButton:PushButton = new PushButton(panel, 20, 60, &quot;Push Me!&quot;);
_PushButton.width = 100;

var _HSlider:HSlider = new HSlider(panel, 20, 90);
var _VSlider:VSlider = new VSlider(panel, 130, 20);

var _VUISlider:VUISlider = new VUISlider(panel, 150, 20, ‘VUISlider’);
_VUISlider.value = 55.5;
var _HUISlider:HUISlider = new HUISlider (panel, 20, 260, ‘HUISlider’);

var _InputText:InputText = new InputText(panel, 20, 110, &quot;Input Text&quot;);

var _ProgressBar:ProgressBar = new ProgressBar(panel, 20, 140);
//trace( &quot;_ProgressBar.maximum : &quot; + _ProgressBar.maximum );
_ProgressBar.value = .75;

var radio1:RadioButton = new RadioButton(panel, 20, 160, &quot;Choice 1&quot;, true);
var radio2:RadioButton = new RadioButton(panel, 20, 180, &quot;Choice 2&quot;);
var radio3:RadioButton = new RadioButton(panel, 20, 200, &quot;Choice 3&quot;);

var _ColorChooser:ColorChooser = new ColorChooser(panel, 20, 230, 0xff0000);

var _IndicatorLight:IndicatorLight = new IndicatorLight (panel, 250, 20, 0xff00ff, &quot;IndicatorLight&quot;);

var _Knob:Knob = new Knob (panel, 350, 20, &quot;Knob&quot;);

var _Meter:Meter = new Meter (panel, 200, 100, &quot;Meter&quot;);

var _RotarySelector:RotarySelector = new RotarySelector (panel, 270, 220, &quot;RotarySelector&quot;);

var _Text:Text = new Text (panel, 80, 170, &quot;Text what ever you want to place in here&quot;);
_Text.setSize (100, 50);

}

} // end class

} // end package
[/as]

And it quite easy to create buttons:
[as]
var myButton:PushButton = new PushButton(this, 10, 20, onClick);
function onClick (e:Event){
trace (‘onClick’);
// do something else
}
[/as]

You can download the MinimalComps set at: http://code.google.com/p/minimalcomps/
The set includes a CheckBox, PushButton, HSlider, VSlider, InputText, ProgressBar, RadioButton, ColorChooser (text input only) and Panel.

One big fat tip from me:
in the zip you will find a folder named ‘assets’ and in there is a truetype font called ‘pf_ronda_seven.ttf‘. You need to install that on your computer (Windows: C:\WINDOWS\Fonts , Apple: ??) and add it to your Flash file.

How to add a font to the Flash Library

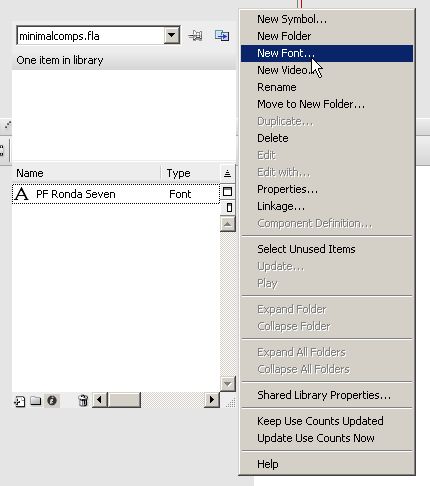
Goto your library, add a “New Font”
Library add New Font
(sorry for the strange looking Flash, it has something to do with my screenshot programm)

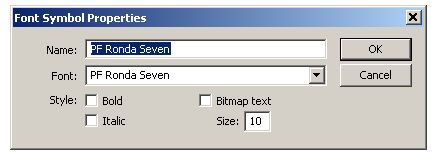
Name: “PF Ronda Seven” (you need to spell this exactly as here, without the quotes (“))
Font: search for “PF Ronda Seven”, if you can’t find it, you probably need to restart Flash.
Size: 10

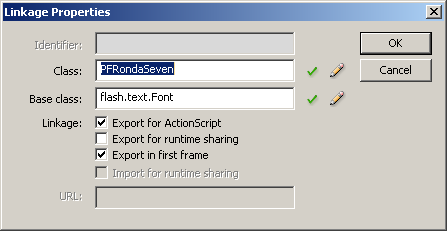
Font Symbol screen
(use this screenshot as an example if you don’t know what I mean)

You need to embed the font from the library into the .FLA : search the font you just created in the library and Right Click >> choose Linkage. Just check “Export for Actionscript” (“Export in first frame” will be activated to). I didn’t change anything, press “OK”

and you done!

Categories
Design Flash Open source / Freeware

Print 2 PDF

I have been using this for some time now: sometimes you need to export something generated in Flash to a (vector) file. Another name for this post could be: Flash2PDF, Flash to PDF, SWF2PDF, SWF to PDF, Export2PDF, Export to PDF….. you catch my drift ๐Ÿ™‚
And the solution is very simple: just print a .PDF!

What is PDF?

Portable Document Format (PDF) lets you capture and view robust informationโ€”from any application, on any computer system.

from the creators: Adobe

Read the explanation from wikipedia

How does it work?

Windows
You need to download (and install) a program: PDFCreator. PDFCreator is opensource: which means a lot, but the only thing you need to know for now is that it’s free.

PDFCreator is a free tool to create PDF files from nearly any Windows application.

After you install it, you can print PDF files from every program: print a document, choose the printer with the name “PDF Creator” and print.
Print screen PDF Creator

Mac OSX
Apple doesn’t need a special program for that; it’s already build in: read more about that here
(can’t tell you much about Mac… I own one, but it’s old so I don’t work on it anymore)

Categories
AS3 Custmm Grumm Grumm Urban papercraft

Custmm Grumm – Selection tool

Custmm Grumm is a project that I will be working on in my spare time.
I will try to build a online tool for creating custom skins and modifying a Grumm.
It’s will be created in Flash (AS3).

The first research I did is selection, and how it works with shapes.
What it does:

  • select an item with one click
  • select an item by dragging (mouse down, mouse up)
  • select multiple items with dragging

What it doesn’t do:

  • shift add a selected item to the current selected items
  • shift click/drag deselect items

A direct link to the file: selectionTool v01

Categories
AS3 Custmm Grumm Grumm Urban papercraft

Custmm Grumm – The project

This will be my most ambitious project in my spare time: Custmm Grumm!

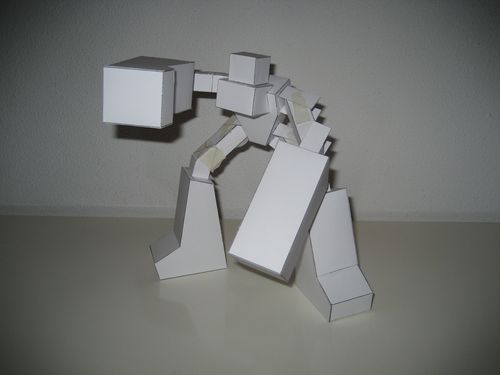
Custmm Grumm

What is Custmm Grumm?

When I created Grumm, I had no plans with the moody fellow. But after I got invited to participate in a book about papertoys I started to think about the future of papertoys (and Grumm).

Two of those thoughts about the future is the base of this project: you should be able to modify/create a papermodel without expensive software or specialized knowledge.

Papertoys are, more then vinyl toys, difficult to customize. You need knowledge of image or vector programs link Photoshop or Illustrator. Besides the knowledge of these programs, you also need the program them selfs, which is not cheap. Another bump in customizing is the flat version of the model: the simple papertoys are not that difficult to understand, but the more complex models with more parts, it’s difficult to know which part goes where and how it will look.
It would be nice that you could create a custom skin and modify the model yourself.

Creating a custom skin for a model is done before: papercritters but modifying the model to isn’t.

I will try to make Custmm Grumm in Flash (AS3) so that it’s possible to create a custom skin and modify the model (with some restrictions of course)…

I had a discussion about this project on Nice Paper Toys if you want to know some more about the rocky start of this project.

Categories
AS3

AS2 to AS3: get all objects in a movieclip

Sometimes you want a list of everything inside a movieclip. For example: you want to know the instance names of every movie in the root.

ActionScript 2

A little trick that I used a lot in AS2 is:

for(var i in _root){
   trace('key: ' + i + ', value: ' + _root[i]);
}

or

for(var i in target_mc){
   trace('key: ' + i + ', value: ' + target_mc[i]);
}

to find out which movies are in target_mc

It was not only a trick to trace everything, I also used it to reset movieclips (place them outside the stage, or delete them) or quickly make buttons out of them:

for(var i in target_mc){
	target_mc[i].id = i;
	target_mc[i].onRelease = function (){
		trace ("id = " + this.id); // onRelease the id will be called (the name of the movie)
	};
}

ActionScript 3

But in AS3 this doesn’t work any more!
And I know: AS3 should make my life easier…. well if I see the solution to the problem created by AS3, I have to disagree!

for (var i:uint = 0; i < target_mc.numChildren; i++){
	trace ('\t|\t ' +i+'.\t name:' + target_mc.getChildAt(i).name + '\t type:' + typeof (target_mc.getChildAt(i))+ '\t' + target_mc.getChildAt(i));
}

In AS3 you first have to get the "number of children" (numChildren) in a DisplayObjectContainer, then you have to say which child you want (getChildAt(i))...
A good thing about AS3 is, you get everything in a movieClip, even shapes you made there without a instance name.

I'm glad that I work with FlashDevelop, which has snippets so I don't have to type this constantly!

(For the people that use FlashDevelop too, here is my snippet:)

// $(Clipboard)is a DisplayObject
trace ('+ number of DisplayObject: ' + $(Clipboard).numChildren + '  --------------------------------');
for (var i:uint = 0; i < $(Clipboard).numChildren; i++){
	trace ('\t|\t ' +i+'.\t name:' + $(Clipboard).getChildAt(i).name + '\t type:' + typeof ($(Clipboard).getChildAt(i))+ '\t' + $(Clipboard).getChildAt(i));
}
trace ('\t+ --------------------------------------------------------------------------------------');